
Rice krispies Christmas trees bring back all the playful crunch and sweet nostalgia of childhood in every bite. Emerald green treats shaped into tiny trees shimmer with creamy marshmallow, a touch of honey or dairy free butter, and candy decorations that look like twinkling ornaments. Perched on peppermint stick trunks, these rice krispies Christmas trees are quick to make, fun to share, and guaranteed to light up holiday tables with smiles in just minutes.
Table of Contents
Why You’ll Love This Rice krispies Christmas trees
- They’re a fun and festive way to celebrate the holidays!
- Quick and easy to make with just a few ingredients.
- Perfect for kids to help with and unleash their creativity.
- Deliciously crunchy and sweet, a treat everyone will enjoy!
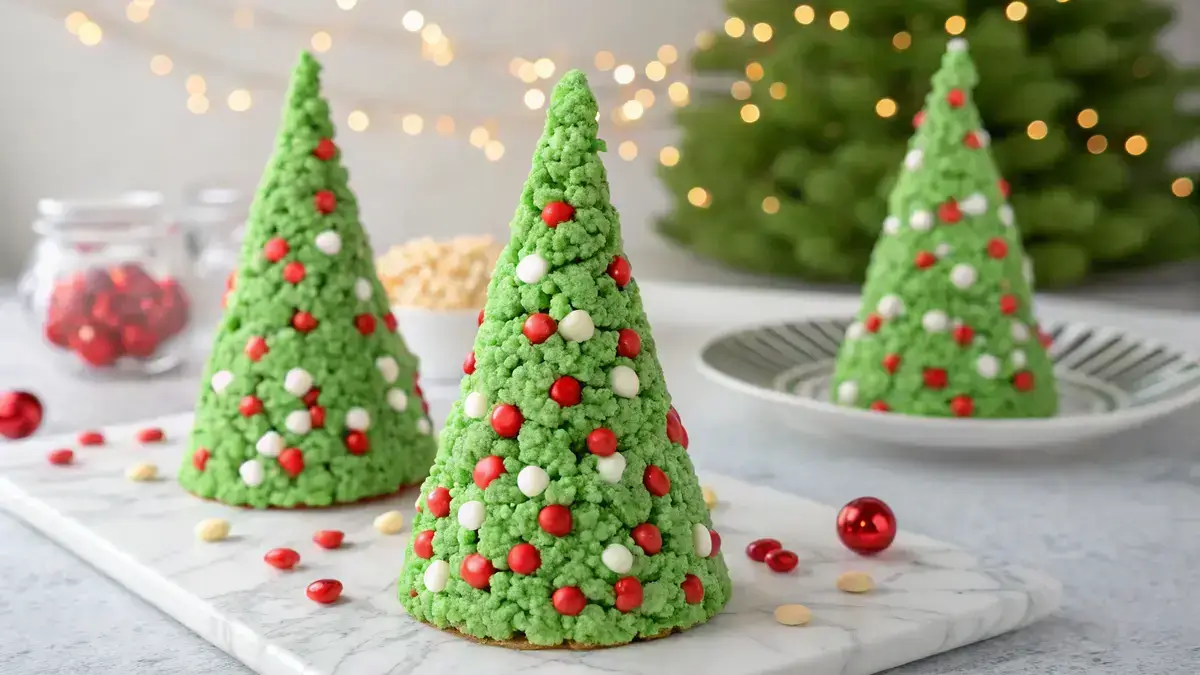
Rice Krispies Christmas Trees
Ingredients
Equipment
Method
- Step 1: In a large saucepan over low heat, melt the butter until it’s completely liquid.
- Step 2: Add the mini marshmallows to the melted butter. Stir continuously until they are completely melted and smooth.
- Step 3: Stir in a few drops of green food coloring until the mixture is evenly tinted a lovely green.
- Step 4: Remove the saucepan from heat and fold in the Rice Krispies cereal. Make sure every piece is coated with the gooey mixture.
- Step 5: Allow the mixture to cool slightly. Then, using oiled hands or a tree-shaped mold, shape the mixture into small tree cones.
- Step 6: Press red and white candies and sprinkles into the trees as ornaments. Get creative with your decorations!
- Step 7: Place your decorated trees on parchment paper and let them set for at least 30 minutes before serving. Enjoy your festive treats!
Notes
| Nutrient | Amount per Serving |
|---|---|
| Calories | 150 |
| Fat | 5g |
| Protein | 1g |
| Carbohydrates | 25g |
| Sugar | 10g |
Ingredients
Get ready to make these fun and festive Rice Krispies Christmas Trees!
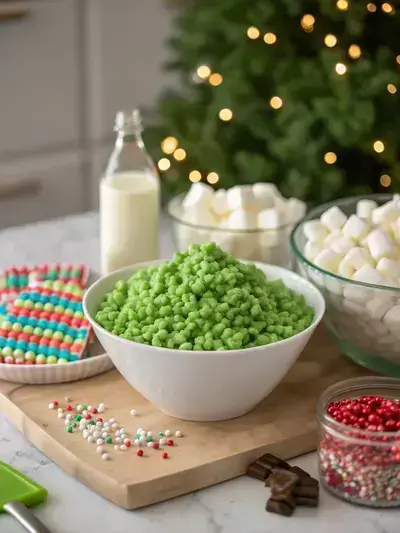
- 6 cups Rice Krispies cereal – the base for your trees
- 4 cups mini marshmallows – for that gooey sweetness
- 3 tablespoons unsalted butter – to bind everything together
- green food coloring – to give your trees a festive hue
- red and white candy-coated chocolates – perfect for decorations
- assorted festive sprinkles – to add some extra cheer
How to Make Rice Krispies Christmas Trees
Get ready to create some festive fun with these delightful Rice Krispies Christmas trees! The preparation time is about 10 minutes, cooking time is around 5 minutes, and you’ll want to let them set for at least 30 minutes before serving. Let’s get started!
Step 1: Melt the Butter
In a large saucepan over low heat, melt the butter until it’s completely liquid.
Step 2: Add Marshmallows
Add the mini marshmallows to the melted butter. Stir continuously until they are completely melted and smooth.
Step 3: Color the Mixture
Stir in a few drops of green food coloring until the mixture is evenly tinted a lovely green.
Step 4: Mix in Rice Krispies
Remove the saucepan from heat and fold in the Rice Krispies cereal. Make sure every piece is coated with the gooey mixture.
Step 5: Shape the Trees
Allow the mixture to cool slightly. Then, using oiled hands or a tree-shaped mold, shape the mixture into small tree cones.
Step 6: Decorate Your Trees
Press red and white candies and sprinkles into the trees as ornaments. Get creative with your decorations!
Step 7: Let Them Set
Place your decorated trees on parchment paper and let them set for at least 30 minutes before serving. Enjoy your festive treats!
Recipe Snapshot
| Feature | Details |
|---|---|
| Category | Dessert |
| Cuisine | American |
| Prep Time | 10 minutes |
| Cook Time | 5 minutes |
| Extra Time | 30 minutes (resting) |
| Total Time | 45 minutes |
| Dietary | Vegetarian |
| Serves | 12 |
| Best Served | Festively decorated and ready to enjoy! |
Pro Tips for Making Rice krispies Christmas trees
- Use fresh marshmallows for a gooey texture.
- Lightly grease your hands to shape the trees easily.
- Add food coloring to the melted chocolate for festive designs.
- Use a serrated knife to trim the edges for a perfect tree shape.
- Decorate with sprinkles or candies for a fun touch.
How to Serve this Rice krispies Christmas trees
- Display them on a festive platter for a cheerful centerpiece.
- Pair with hot cocoa or warm apple cider for a cozy treat.
- Use them as fun decorations on a holiday dessert table.
- Wrap them in cellophane and give as sweet gifts to friends and family.
Make Ahead and Storage
Storing and enjoying your Rice Krispies Christmas Trees is easy!
Storing Rice Krispies Christmas Trees Leftovers
- Allow the trees to cool completely before storing.
- Place them in an airtight container.
- Keep at room temperature for up to 3 days.
- Avoid stacking to prevent squishing.
Freezing Rice Krispies Christmas Trees
- Wrap each tree individually in plastic wrap.
- Place wrapped trees in a freezer-safe bag or container.
- Label with the date for easy reference.
- Freeze for up to 2 months for best quality.
Reheating Rice Krispies Christmas Trees
- Thaw in the refrigerator overnight if frozen.
- Let sit at room temperature for about 30 minutes before serving.
- Enjoy as is; no reheating needed!
- If desired, warm slightly in the microwave for 5-10 seconds.
Explore more easy breakfast recipes, quick lunch ideas, cozy dinner meals, tasty snacks, and delightful dessert.
FAQs
Here’s a helpful FAQ about this recipe:
1. How do I make Rice Krispies Christmas trees?
To make Rice Krispies Christmas trees, start by melting butter and marshmallows in a large pot over low heat. Once melted, stir in Rice Krispies cereal until well coated. Allow the mixture to cool slightly, then shape it into tree forms using your hands or a cookie cutter. Let them set before decorating!
2. What ingredients do I need for Rice Krispies Christmas trees?
You will need Rice Krispies cereal, marshmallows, butter, and optional food coloring for a festive touch. For decoration, consider using chocolate melts, sprinkles, or mini candies to make your trees extra special!
3. How can I decorate Rice Krispies Christmas trees?
You can decorate your Rice Krispies Christmas trees with melted chocolate or candy melts drizzled over the top. Add colorful sprinkles, mini marshmallows, or edible glitter for a fun and festive look. Get creative with your decorations to make each tree unique!
4. What is the best way to store Rice Krispies Christmas trees?
To store your Rice Krispies Christmas trees, place them in an airtight container at room temperature. They can last for about a week. If you want to keep them fresh longer, you can refrigerate them, but be aware that they may become a bit harder. Just let them sit at room temperature for a few minutes before enjoying!
Final Thoughts
Making Rice Krispies Christmas trees is a delightful way to spread holiday cheer! These festive treats are not only simple to whip up but also a joy to decorate. Gather your loved ones, unleash your creativity, and enjoy the sweet rewards of your efforts. Happy holidays, and may your kitchen be filled with laughter and love!