


Recipe card
Print / PDFtiramisu cups
Rate this recipe
Be the first to rate
- Prep Time
- 30 mins
- chilling
- 4 hrs
- Total Time
- 4 hrs 30 mins
Ingredients
- 6 egg yolks egg yolks (for a rich and creamy base)
- 3/4 cup granulated sugar (to sweeten the mixture)
- 1 cup mascarpone cheese (adds creaminess and flavor)
- 1 cup heavy cream (for a fluffy texture)
- 1 teaspoon vanilla extract (enhances the flavor)
- 1 cup strong brewed coffee (cooled) (to soak the ladyfingers)
- 24 pieces ladyfingers (the classic base for tiramisu)
- 2 tablespoons unsweetened cocoa powder (for dusting)
- to taste chocolate shavings (for garnish)
Equipment
- 1 Heatproof bowl — For whisking egg yolks and sugar.
- 1 Separate Bowl — For whipping heavy cream.
- 1 Pot — For simmering water.
- 1 serving cups — For layering the tiramisu.
Method
- 1
In a heatproof bowl, whisk together the egg yolks and sugar. Set this bowl over a pot of simmering water. Keep whisking until the mixture becomes thick and pale.
- 2
Remove the bowl from heat. Gently fold in the mascarpone cheese until the mixture is smooth and creamy.
- 3
In a separate bowl, whip the heavy cream and vanilla extract until stiff peaks form. Carefully fold this whipped cream into the mascarpone mixture.
- 4
Dip the ladyfingers briefly into cooled coffee. Layer them in your serving cups, creating a delightful base.
- 5
Spoon half of the mascarpone mixture over the layer of ladyfingers, spreading it evenly.
- 6
Add another layer of coffee-dipped ladyfingers, followed by the remaining mascarpone mixture on top.
- 7
Dust the top with cocoa powder and garnish with chocolate shavings for that extra touch of elegance.
- 8
Refrigerate your tiramisu cups for at least 4 hours before serving. This will help all the flavors meld beautifully!
Notes
| Nutrient | Amount per Serving |
|---|---|
| Calories | 350 |
| Fat | 25g |
| Protein | 6g |
| Carbs | 30g |
Why You’ll Love This tiramisu cups
- Decadent layers of creamy mascarpone and coffee-soaked ladyfingers.
- Perfectly portioned for individual indulgence—no sharing required!
- Quick and easy to assemble, making dessert a breeze.
- Customizable with your favorite flavors—try chocolate or caramel!
- Impressive enough for guests, yet simple enough for a weeknight treat.
Ingredients
Here’s what you’ll need to make your delightful tiramisu cups!
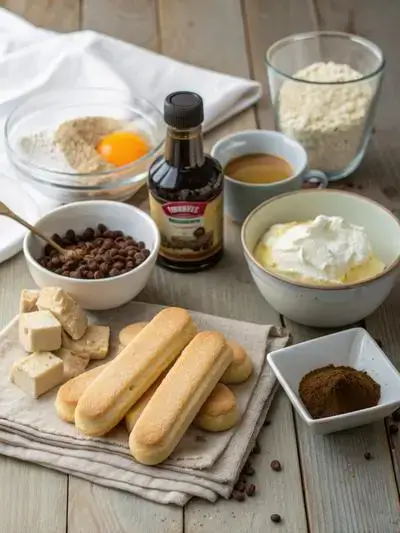
- 6 egg yolks – for a rich and creamy base
- 3/4 cup granulated sugar – to sweeten the mixture
- 1 cup mascarpone cheese – adds creaminess and flavor
- 1 cup heavy cream – for a fluffy texture
- 1 teaspoon vanilla extract – enhances the flavor
- 1 cup strong brewed coffee (cooled) – to soak the ladyfingers
- 24 ladyfingers – the classic base for tiramisu
- 2 tablespoons unsweetened cocoa powder – for dusting
- chocolate shavings – for garnish
How to Make tiramisu cups
Get ready to indulge in these delightful tiramisu cups! With a preparation time of 30 minutes, a cooking time of 0 minutes, and a chilling time of at least 4 hours, you’ll want to plan ahead for this delicious treat.

Step 1: Whisk Egg Yolks and Sugar
In a heatproof bowl, whisk together the egg yolks and sugar. Set this bowl over a pot of simmering water. Keep whisking until the mixture becomes thick and pale.
Step 2: Fold in Mascarpone
Remove the bowl from heat. Gently fold in the mascarpone cheese until the mixture is smooth and creamy.
Step 3: Whip Heavy Cream
In a separate bowl, whip the heavy cream and vanilla extract until stiff peaks form. Carefully fold this whipped cream into the mascarpone mixture.
Step 4: Prepare Ladyfingers
Dip the ladyfingers briefly into cooled coffee. Layer them in your serving cups, creating a delightful base.
Step 5: Add Mascarpone Mixture
Spoon half of the mascarpone mixture over the layer of ladyfingers, spreading it evenly.
Step 6: Repeat Layers
Add another layer of coffee-dipped ladyfingers, followed by the remaining mascarpone mixture on top.
Step 7: Dust and Garnish
Dust the top with cocoa powder and garnish with chocolate shavings for that extra touch of elegance.
Step 8: Chill Before Serving
Refrigerate your tiramisu cups for at least 4 hours before serving. This will help all the flavors meld beautifully!
Recipe Snapshot
| Feature | Details |
|---|---|
| Category | Dessert |
| Cuisine | Italian |
| Prep Time | 30 minutes |
| Cook Time | 0 minutes |
| Extra Time | 240 minutes (resting) |
| Total Time | 270 minutes |
| Dietary | Vegetarian |
| Serves | 6 |
| Best Served | Chilled and garnished |
Pro Tips for Making tiramisu cups
- Opt for strong brewed coffee or espresso for rich flavor.
- Use mascarpone cheese for a creamy texture; substitute with cream cheese if needed.
- Layer your ingredients gently to avoid sogginess.
- Chill the cups for at least 4 hours to enhance the flavors.
- Top with cocoa powder or shaved chocolate just before serving for a delightful finish.
How to Serve this tiramisu cups
- Top with a sprinkle of cocoa powder for a classic touch.
- Add a dollop of whipped cream for extra creaminess.
- Garnish with chocolate shavings or dark chocolate curls.
- Serve alongside fresh berries for a fruity contrast.
- Pair with a cup of rich coffee or a creamy latte.
- For a twist, try adding a layer of fruit puree between the mascarpone layers.
- Use clear cups to showcase the beautiful layers for a stunning presentation.
Make Ahead and Storage
You can prepare and store your tiramisu cups for later enjoyment:
Storing Leftovers
- Cover each cup tightly with plastic wrap.
- Store in the refrigerator for up to 3 days.
- Keep away from strong-smelling foods to avoid flavor transfer.
Freezing
- Wrap each cup in plastic wrap and then foil.
- Label with the date and freeze for up to 2 months.
- Thaw in the refrigerator overnight before serving.
Reheating
- Reheating is not recommended; serve chilled.
- If desired, let sit at room temperature for 15 minutes before serving.
- This enhances the flavors and texture.
Explore more easy breakfast recipes, quick lunch ideas, cozy dinner meals, tasty snacks, and delightful dessert.
Final Thoughts
Get ready to indulge in these delightful tiramisu cups! They’re not just a treat for the taste buds but also a breeze to whip up. Perfect for sharing or savoring solo, each spoonful is a little taste of nostalgia. So grab your ingredients, channel your inner chef, and enjoy the sweet rewards of this simple yet stunning dessert!
Quick answers
Frequently asked questions
Straight answers from the kitchen — storage, swaps, and common sticking points for this recipe.
Does Costco have tiramisu cups?
Are Costco tiramisu cups worth buying?
Are Costco tiramisu cups made in Italy?
What are common tiramisu mistakes?
Kitchen notes
Nutrition & sources
Calorie and nutrition figures on this page are estimates meant for general home-cooking guidance. Actual values vary with brands, portion size, and how the recipe is prepared.
Estimates draw on typical ingredient data from public nutrition databases such as the USDA FoodData Central. They are not a substitute for professional medical or dietary advice.
For how recipes are tested and when pages are updated, see How we test recipes. Full legal context lives in our disclaimers and affiliate disclosure.


Comments
Made this recipe? Share how it turned out for your family.
No comments yet — be the first to leave a note.