


Recipe card
Print / PDFMini Tartlet Recipe
Rate this recipe
Be the first to rate
- Prep Time
- 30 mins
- Cook Time
- 25 mins
- chill the dough
- 30 mins
- Total Time
- 1 hr 25 mins
Ingredients
- 1 ½ cups all-purpose flour
- ½ cup unsalted butter, chilled and diced
- ¼ cup granulated sugar
- 2-3 tablespoons cold water
- 1 large egg yolk
- 1 pinch salt
- ½ to 1 cup fresh fruit or jam for filling (Choose your favorite flavor.)
Equipment
- 1 Mixing bowl — For combining ingredients.
- 1 Rolling Pin — For rolling out the dough.
- 1 Tartlet pans — For baking the tartlets.
Method
- 1
Step 1: Preheat your oven to 350°F (175°C). This ensures your tartlets bake evenly and come out perfectly golden.
- 2
Step 2: In a bowl, combine flour, sugar, and salt. Mix them well to blend the flavors.
- 3
Step 3: Cut in the butter until the mixture resembles coarse crumbs. This step is crucial for a flaky crust!
- 4
Step 4: Mix in the egg yolk and cold water until a dough forms. Don’t be afraid to get your hands in there!
- 5
Step 5: Chill the dough for 30 minutes. This helps it firm up and makes it easier to roll out.
- 6
Step 6: Roll out the chilled dough on a floured surface. Aim for a thickness of about 1/8 inch.
- 7
Step 7: Carefully press the rolled-out dough into your tartlet pans. Make sure to cover the bottom and sides well.
- 8
Step 8: Fill each tartlet with your favorite fruit or jam. Get creative with your fillings!
- 9
Step 9: Bake for 20-25 minutes until the crust is golden. Your kitchen will smell amazing!
- 10
Step 10: Allow the tartlets to cool before serving. Enjoy your delicious bite-sized treats!
Notes
| Nutrient | Amount per Serving |
|---|---|
| Calories | 150 |
| Fat | 8g |
| Protein | 2g |
| Carbs | 18g |
Why You’ll Love This tartlet
- Perfectly portioned for a delightful bite.
- Endless flavor combinations to suit any palate.
- Visually stunning, making any table shine.
- Easy to customize for dietary preferences.
- Great for gatherings or a sweet treat at home.
Ingredients
Gather these simple ingredients to create delicious tartlets that everyone will love!
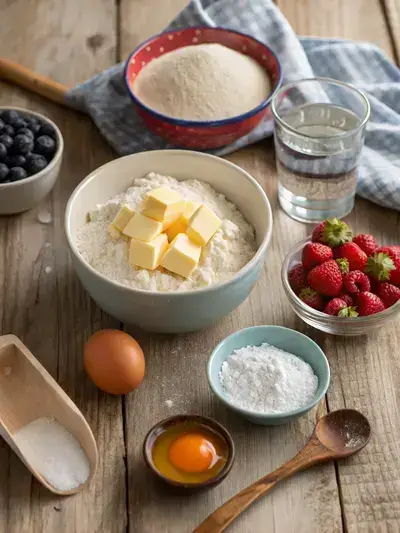
- 1 ½ cups – all-purpose flour
- ½ cup – unsalted butter, chilled and diced
- ¼ cup – granulated sugar
- 2-3 tablespoons – cold water
- 1 – large egg yolk
- 1 pinch – salt
- ½ to 1 cup – fresh fruit or jam for filling
How to Make tartlet
Making this mini Tart is a delightful experience! The preparation time is about 30 minutes, with a cooking time of 20-25 minutes. Don’t forget to chill the dough for 30 minutes before rolling it out!
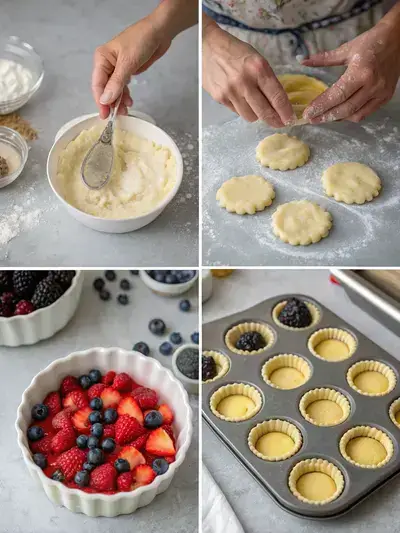
Step 1: Preheat the Oven
Preheat your oven to 350°F (175°C). This ensures your tartlets bake evenly and come out perfectly golden.
Step 2: Prepare the Dough
In a bowl, combine flour, sugar, and salt. Mix them well to blend the flavors.
Step 3: Cut in the Butter
Cut in the butter until the mixture resembles coarse crumbs. This step is crucial for a flaky crust!
Step 4: Add Egg Yolk and Water
Mix in the egg yolk and cold water until a dough forms. Don’t be afraid to get your hands in there!
Step 5: Chill the Dough
Chill the dough for 30 minutes. This helps it firm up and makes it easier to roll out.
Step 6: Roll Out the Dough
Roll out the chilled dough on a floured surface. Aim for a thickness of about 1/8 inch.
Step 7: Press into Tartlet Pans
Carefully press the rolled-out dough into your tartlet pans. Make sure to cover the bottom and sides well.
Step 8: Fill with Fruit or Jam
Fill each mini Tart with your favorite fruit or jam. Get creative with your fillings!
Step 9: Bake the Tartlets
Bake for 20-25 minutes until the crust is golden. Your kitchen will smell amazing!
Step 10: Cool Before Serving
Allow it to cool before serving. Enjoy your delicious bite-sized treats!
Recipe Snapshot
| Feature | Details |
|---|---|
| Category | Dessert |
| Cuisine | American |
| Prep Time | 30 minutes |
| Cook Time | 25 minutes |
| Extra Time | 30 minutes (resting) |
| Total Time | 85 minutes |
| Dietary | Vegetarian |
| Serves | 12 |
| Best Served | Chilled or at room temperature |
Pro Tips for Making tartlet
- Chill your mini Tart shells before filling for a crisp texture.
- Experiment with different fillings like fruit curds or chocolate ganache.
- Use a pastry brush to apply egg wash for a golden finish.
- Let it cool completely before serving to enhance flavors.
How to Serve this mini Tart
- Top with fresh berries for a burst of color and flavor.
- Drizzle with chocolate or caramel sauce for extra sweetness.
- Pair with a scoop of vanilla ice cream for a delightful contrast.
- Serve alongside a refreshing fruit salad for a light touch.
- Garnish with mint leaves for a pop of freshness.
- Offer a variety of fillings to create a mini tartlet bar for guests.
Make Ahead and Storage
You can prepare and store your mini Tarts for later enjoyment:
Storing Leftovers
- Allow tartlet leftovers to cool completely.
- Place them in an airtight container.
- Store in the refrigerator for up to 3 days.
- Keep separate from any toppings to maintain texture.
Freezing
- Cool tartlets completely before freezing.
- Wrap each mini Tart in plastic wrap tightly.
- Place wrapped it in a freezer-safe bag or container.
- Freeze for up to 2 months for best quality.
Reheating
- Preheat your oven to 350°F (175°C).
- Remove tartlets from the refrigerator or freezer.
- Place on a baking sheet and cover loosely with foil.
- Heat for about 10-15 minutes until warmed through.
Explore more easy breakfast recipes, quick lunch ideas, cozy dinner meals, tasty snacks, and delightful dessert.
Final Thoughts
Now that you have the ultimate mini tartlet recipe, it’s time to unleash your inner pastry chef! These delightful bite-sized treats are not only simple to make but also incredibly rewarding. Whether for a special occasion or just a sweet craving, enjoy every delicious moment. Happy baking, and may your mini Tart bring smiles all around!
Quick answers
Frequently asked questions
Straight answers from the kitchen — storage, swaps, and common sticking points for this recipe.
What is the difference between a tart and a tartlet?
What is a tartlet?
What is the difference between a tartlet and a galette?
What’s the difference between a quiche and a tartlet?
Kitchen notes
Nutrition & sources
Calorie and nutrition figures on this page are estimates meant for general home-cooking guidance. Actual values vary with brands, portion size, and how the recipe is prepared.
Estimates draw on typical ingredient data from public nutrition databases such as the USDA FoodData Central. They are not a substitute for professional medical or dietary advice.
For how recipes are tested and when pages are updated, see How we test recipes. Full legal context lives in our disclaimers and affiliate disclosure.


Comments
Made this recipe? Share how it turned out for your family.
No comments yet — be the first to leave a note.