

Sub rolls turn everyday meals into something special, and this easy recipe shows just how simple it is to bake soft, golden sandwich buns at home. As the dough rises and bakes, your kitchen fills with the comforting aroma of fresh bread and warm crusts. Light and tender inside yet sturdy enough for hearty fillings, these rolls are made with pantry staples and a splash of apple cider vinegar for extra lift. Perfect for sharing, they bring homemade magic to every sandwich moment.
Table of Contents
Why You’ll Love This Sub Rolls
- Soft and fluffy texture that melts in your mouth.
- Perfect for any filling, from meats to veggies.
- Easy to make with simple ingredients you already have.
- Customizable to suit your taste—add herbs or spices!

Sub Rolls
Ingredients
Equipment
Method
- In a bowl, dissolve 2 teaspoons of yeast and 1 tablespoon of sugar in 1 cup of warm water. Let it sit for 5 minutes until it becomes frothy.
- Stir in 2 tablespoons of oil and 1 teaspoon of salt. Gradually add 3 cups of flour to form a dough.
- Knead the dough on a floured surface for 8–10 minutes until it’s smooth and elastic.
- Place the dough in an oiled bowl, cover it with a cloth, and let it rise in a warm place for 1 hour.
- After rising, punch down the dough. Divide it into 6 equal portions and shape each into a roll. Place them on a baking sheet.
- Cover the rolls and let them rise for another 30 minutes.
- Preheat your oven to 400°F (200°C) while the rolls are rising.
- Bake the rolls for 15–18 minutes until they are golden brown.
- Let the rolls cool before slicing and serving. Enjoy your homemade sub rolls!
Notes
| Nutrient | Amount per Serving |
|---|---|
| Calories | 150 |
| Fat | 3g |
| Protein | 5g |
| Carbs | 28g |
Ingredients
Get ready to make the fluffiest sub rolls! Gather these simple ingredients.
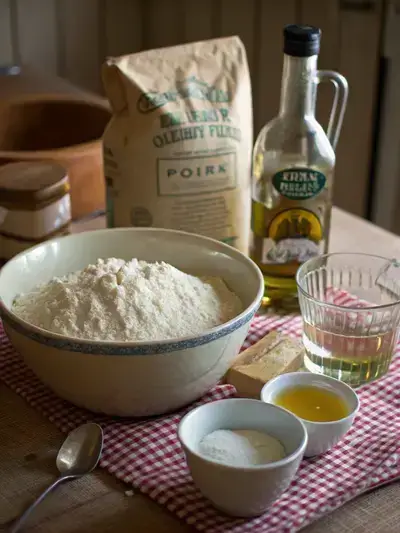
- 3 ½ cups all-purpose flour – for a soft texture
- 1 packet active dry yeast – helps the rolls rise
- 1 tablespoon sugar – adds a hint of sweetness
- 1 teaspoon salt – enhances flavor
- 1 cup warm water – activates the yeast
- 2 tablespoons olive oil – keeps rolls moist
How to Make Sub Rolls
Making sub rolls is a delightful experience! With a preparation time of about 15 minutes, a cooking time of 15–18 minutes, and a resting time of 1 hour and 30 minutes, you’ll have soft and fluffy rolls ready to enjoy.
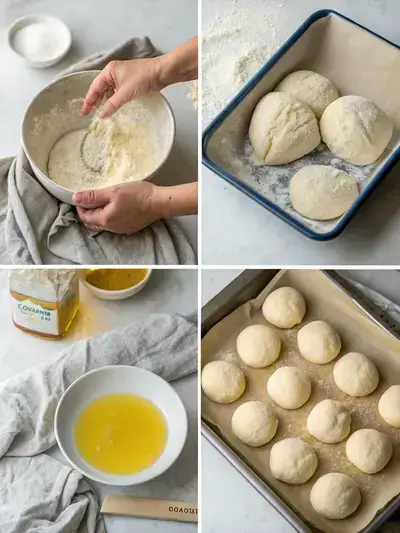
Step 1: Dissolve Yeast
In a bowl, dissolve 2 teaspoons of yeast and 1 tablespoon of sugar in 1 cup of warm water. Let it sit for 5 minutes until it becomes frothy.
Step 2: Mix Ingredients
Stir in 2 tablespoons of oil and 1 teaspoon of salt. Gradually add 3 cups of flour to form a dough.
Step 3: Knead the Dough
Knead the dough on a floured surface for 8–10 minutes until it’s smooth and elastic.
Step 4: First Rise
Place the dough in an oiled bowl, cover it with a cloth, and let it rise in a warm place for 1 hour.
Step 5: Shape the Rolls
After rising, punch down the dough. Divide it into 6 equal portions and shape each into a roll. Place them on a baking sheet.
Step 6: Second Rise
Cover the rolls and let them rise for another 30 minutes.
Step 7: Preheat Oven
Preheat your oven to 400°F (200°C) while the rolls are rising.
Step 8: Bake the Rolls
Bake the rolls for 15–18 minutes until they are golden brown.
Step 9: Cool and Serve
Let the rolls cool before slicing and serving. Enjoy your homemade sub rolls!
Recipe Snapshot
| Feature | Details |
|---|---|
| Category | Bread |
| Cuisine | American |
| Prep Time | 15 minutes |
| Cook Time | 18 minutes |
| Extra Time | 90 minutes (resting) |
| Total Time | 123 minutes |
| Dietary | Vegetarian |
| Serves | 6 |
| Best Served | Freshly baked with your favorite fillings! |
Pro Tips for Making Sub Rolls
- Use bread flour for a chewier texture.
- Let the dough rise in a warm place for best results.
- Shape the rolls gently to keep them fluffy.
- Brush with melted butter for a golden crust.
- Store in a paper bag to maintain softness.
How to Serve this Sub Rolls
- Fill with your favorite deli meats and cheeses for a classic sub.
- Layer on fresh veggies like lettuce, tomatoes, and cucumbers for crunch.
- Spread a zesty aioli or mustard for an extra kick.
- Make a hearty veggie sub with hummus and roasted peppers.
- Serve with a side of homemade potato chips or a crisp salad.
- Toast the rolls lightly for a warm, crispy texture.
- Try a breakfast sub with scrambled eggs and cheese.
- Pair with a refreshing iced tea or lemonade for a perfect meal.
Make Ahead and Storage
Store your delicious sub rolls with these simple tips:
Storing Sub Rolls Leftovers
- Let the rolls cool completely before storing.
- Wrap them tightly in plastic wrap or aluminum foil.
- Place wrapped rolls in an airtight container or a resealable bag.
- Store in the refrigerator for up to 3 days.
Freezing Sub Rolls
- Wrap each roll individually in plastic wrap.
- Place wrapped rolls in a freezer-safe bag or container.
- Label with the date and freeze for up to 3 months.
- For best quality, avoid stacking rolls directly on top of each other.
Reheating Sub Rolls
- For frozen rolls, thaw in the refrigerator overnight.
- Reheat in a preheated oven at 350°F (175°C) for 10-15 minutes.
- For a softer texture, wrap in foil while reheating.
- Enjoy warm for the best taste and texture!
Explore more easy breakfast recipes, quick lunch ideas, cozy dinner meals, tasty snacks, and delightful dessert.
FAQs
Here’s a helpful FAQ about this recipe:
1. What kind of bread is a sub roll?
Sub rolls are a type of bread that is soft and slightly chewy, making them perfect for holding a variety of fillings. They are typically longer and wider than regular sandwich bread, allowing for generous portions of meats, cheeses, and vegetables. The texture is often fluffy on the inside with a slightly crusty exterior, which helps to keep the fillings contained while adding a delightful bite.
2. What’s the difference between a hoagie and a sub roll?
While both hoagies and sub rolls are similar in that they are used for sandwiches, the main difference lies in the regional terminology and the types of fillings used. A hoagie is often associated with a specific style of sandwich that includes Italian meats and cheeses, while a sub roll can be filled with a wider variety of ingredients. Essentially, all hoagies can be made with sub rolls, but not all sub sandwiches are hoagies!
3. Why are they called sub rolls?
The term ‘sub roll’ is derived from the word ‘submarine,’ which refers to the shape of the sandwich that resembles a submarine boat. This name is particularly popular in the northeastern United States. The elongated shape of the roll makes it ideal for stuffing with various fillings, hence the association with the submarine sandwich. It’s a fun and fitting name for such a delicious creation!
4. What to put in a sub roll?
Sub rolls are incredibly versatile and can be filled with a wide range of ingredients. Popular choices include deli meats like turkey, chicken, or roast beef, along with cheeses, lettuce, tomatoes, onions, and condiments like mayonnaise or mustard. You can also get creative with vegetarian options, using grilled vegetables, hummus, or avocado. The possibilities are endless, so feel free to customize your sub roll to suit your taste!
Final Thoughts
There’s nothing quite like the joy of biting into a soft, fluffy sub roll that you made yourself! Whether you’re crafting a classic Italian hoagie or a veggie delight, these rolls are sure to bring smiles to the table. So roll up your sleeves, get baking, and enjoy the delicious rewards of your efforts. Happy sandwich making!