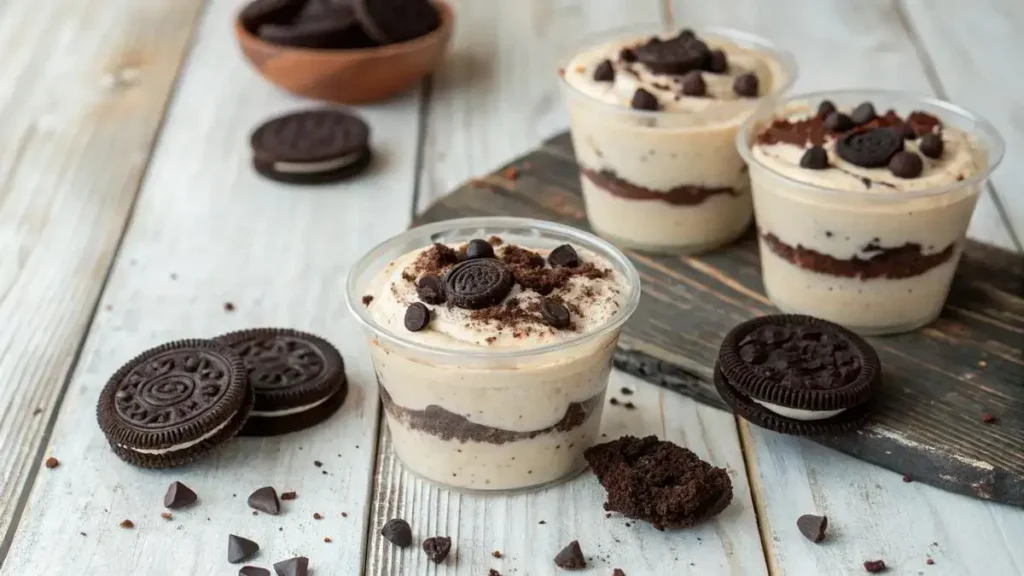
oreo dessert cups are a playful twist on the beloved chocolate sandwich cookie, where creamy vanilla filling meets rich, crunchy cookie crumbles. Layer velvety mascarpone sweetened with a little honey or fluffy whipped coconut cream over crushed Oreos, then finish each cup with a drizzle of dairy-free chocolate ganache and a pinch of sea salt. Perfect for weekend gatherings, movie nights, or anytime your sweet tooth calls, these mini treats come together with just a few simple ingredients. Every spoonful delivers layered joy and chocolatey crunch, making oreo dessert cups an easy indulgence you will crave again and again.
Table of Contents
Why You’ll Love This Oreo Dessert Cups
- Decadent layers of creamy goodness and crunchy Oreo bits.
- Quick and easy to prepare, perfect for any occasion.
- Customizable with your favorite toppings for a personal touch.
- Perfectly portioned for guilt-free indulgence.
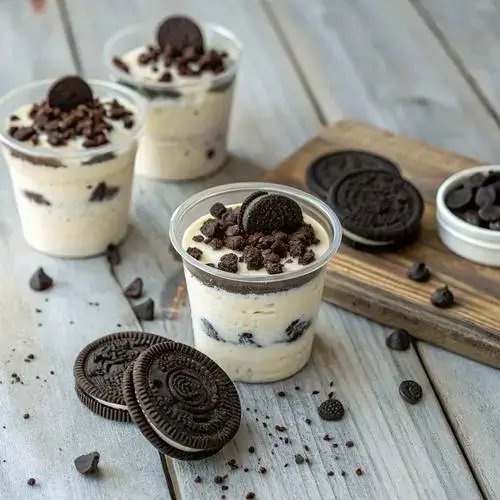
Oreo Dessert Cups
Ingredients
Equipment
Method
- Step 1: Crush the Oreos. Place 16 Oreo cookies in a zip-top bag. Crush them with a rolling pin until fine crumbs form.
- Step 2: Make the Crust. In a bowl, combine the Oreo crumbs with melted butter. Stir until evenly moistened.
- Step 3: Divide the Crust. Divide the crumb mixture among 12 small dessert cups or jars. Press it firmly into the bottom to form a crust.
- Step 4: Prepare the Cream Cheese Filling. In a separate mixing bowl, beat the softened cream cheese and powdered sugar until smooth and creamy.
- Step 5: Add Vanilla. Add vanilla extract and continue to beat until combined.
- Step 6: Whip the Cream. In another chilled bowl, whip the heavy cream to stiff peaks, about 2–3 minutes.
- Step 7: Combine Mixtures. Gently fold the whipped cream into the cream cheese mixture until fully incorporated and no streaks remain.
- Step 8: Fill the Cups. Spoon or pipe the cream cheese filling over the Oreo crust in each cup, filling nearly to the top.
- Step 9: Add Toppings. Crush the remaining 8 Oreo cookies and sprinkle the crumbs over each filled cup.
- Step 10: Chill and Serve. Refrigerate the dessert cups for at least 1 hour before serving to allow them to set. Garnish with mini Oreo halves or chocolate shavings just before serving, if desired.
Notes
| Nutrient | Amount per Serving |
|---|---|
| Calories | 250 |
| Fat | 18g |
| Protein | 3g |
| Carbohydrates | 22g |
| Sugar | 10g |
Ingredients
Here’s everything you’ll need to create your delightful Oreo Dessert Cups!
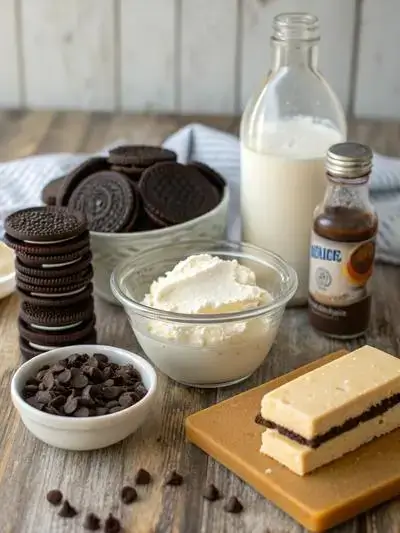
- 24 Oreo cookies – divided for crust and filling
- 4 tablespoons unsalted butter – melted for binding
- 8 ounces cream cheese – softened for creamy texture
- 1/2 cup powdered sugar – sweetener for the filling
- 1 cup heavy whipping cream – for the fluffy topping
- 1 teaspoon vanilla extract – adds flavor
- Optional garnish – mini Oreo halves or chocolate shavings
How to Make Oreo Dessert Cups
Get ready to indulge in these delightful Oreo Dessert Cups! With a preparation time of 20 minutes, no cooking time, and a chilling time of at least 1 hour, you’ll have a delicious treat ready to impress your friends and family.
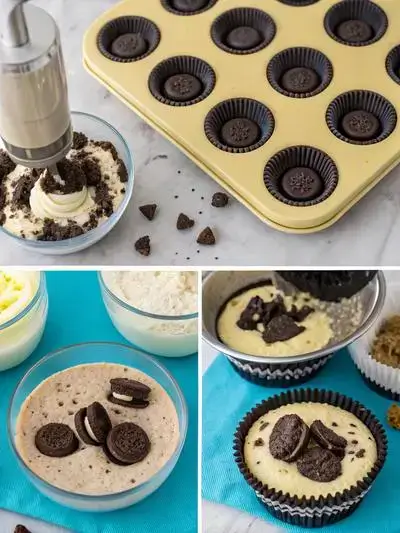
Step 1: Crush the Oreos
Place 16 Oreo cookies in a zip-top bag. Crush them with a rolling pin until fine crumbs form.
Step 2: Make the Crust
In a bowl, combine the Oreo crumbs with melted butter. Stir until evenly moistened.
Step 3: Divide the Crust
Divide the crumb mixture among 12 small dessert cups or jars. Press it firmly into the bottom to form a crust.
Step 4: Prepare the Cream Cheese Filling
In a separate mixing bowl, beat the softened cream cheese and powdered sugar until smooth and creamy.
Step 5: Add Vanilla
Add vanilla extract and continue to beat until combined.
Step 6: Whip the Cream
In another chilled bowl, whip the heavy cream to stiff peaks, about 2–3 minutes.
Step 7: Combine Mixtures
Gently fold the whipped cream into the cream cheese mixture until fully incorporated and no streaks remain.
Step 8: Fill the Cups
Spoon or pipe the cream cheese filling over the Oreo crust in each cup, filling nearly to the top.
Step 9: Add Toppings
Crush the remaining 8 Oreo cookies and sprinkle the crumbs over each filled cup.
Step 10: Chill and Serve
Refrigerate the dessert cups for at least 1 hour before serving to allow them to set. Garnish with mini Oreo halves or chocolate shavings just before serving, if desired.
Recipe Snapshot
| Feature | Details |
|---|---|
| Category | Dessert |
| Cuisine | American |
| Prep Time | 20 minutes |
| Cook Time | 0 minutes |
| Extra Time | 60 minutes (Chilling) |
| Total Time | 80 minutes |
| Dietary | No-Bake |
| Serves | 12 |
| Best Served | Chilled and garnished |
Pro Tips for Making Oreo Dessert Cups
- Crush Oreos finely for a smoother texture.
- Chill your dessert cups before serving for a refreshing treat.
- Experiment with different layers like whipped cream or pudding.
- Use a piping bag for neat and beautiful layers.
- Top with mini chocolate chips for added crunch.
How to Serve this Oreo Dessert Cups
- Top with whipped cream and a sprinkle of crushed Oreos for extra crunch.
- Serve in clear cups to showcase the beautiful layers.
- Pair with fresh berries for a fruity contrast.
- Drizzle with chocolate syrup for a decadent touch.
- Offer mini spoons for a fun, bite-sized experience.
- Chill before serving for a refreshing treat on warm days.
- Include a scoop of vanilla ice cream on the side for an indulgent combo.
Make Ahead and Storage
Storing and enjoying your Oreo Dessert Cups later is easy!
Storing Oreo Dessert Cups Leftovers
- Cover with plastic wrap or transfer to an airtight container.
- Store in the refrigerator for up to 3 days.
- Keep layers intact for best texture.
Freezing Oreo Dessert Cups
- Assemble cups but do not add toppings.
- Wrap tightly in plastic wrap and then foil.
- Freeze for up to 2 months.
- Thaw in the refrigerator before serving.
Reheating Oreo Dessert Cups
- Best enjoyed cold; no reheating needed.
- If desired, let sit at room temperature for 15 minutes.
- Top with fresh whipped cream before serving.
Explore more easy breakfast recipes, quick lunch ideas, cozy dinner meals, tasty snacks, and delightful dessert.
FAQs
Here’s a helpful FAQ about this recipe:
1. How do you make Oreo Dessert Cups?
Making Oreo Dessert Cups is a delightful and straightforward process! Start by crushing Oreo cookies into fine crumbs. Then, mix these crumbs with melted butter to create a crust. In a separate bowl, whip together cream cheese, powdered sugar, and whipped cream until smooth. Layer the crust and the cream mixture in cups, topping with more crushed Oreos and a dollop of whipped cream. Chill in the fridge for a bit, and you’re ready to enjoy these delicious treats!
2. What ingredients are needed for Oreo Dessert Cups?
To make Oreo Dessert Cups, you’ll need a few simple ingredients: Oreo cookies, unsalted butter, cream cheese, powdered sugar, and whipped cream. You can also add some vanilla extract for extra flavor. These ingredients come together to create a rich and creamy dessert that everyone will love!
3. Can I make Oreo Dessert Cups ahead of time?
Absolutely! Oreo Dessert Cups can be made ahead of time, making them perfect for parties or gatherings. Just prepare the cups and store them in the refrigerator until you’re ready to serve. They can be made a day in advance, allowing the flavors to meld beautifully. Just be sure to add any toppings right before serving for the best texture!
4. How can I customize Oreo Dessert Cups with different flavors?
Customizing Oreo Dessert Cups is a fun way to get creative! You can try using different flavored Oreos, like mint or peanut butter, to change the base flavor. Additionally, consider adding layers of fruit, such as strawberries or bananas, or even a drizzle of chocolate or caramel sauce. You can also mix in flavored extracts, like almond or coconut, into the cream mixture for a unique twist. The possibilities are endless!
Final Thoughts
Get ready to indulge in these delightful Oreo Dessert Cups! They’re not just easy to make, but they also bring back sweet memories of childhood treats. So gather your ingredients, whip up this simple recipe, and enjoy every creamy, crunchy bite. Trust me, you’ll be smiling with each spoonful!