

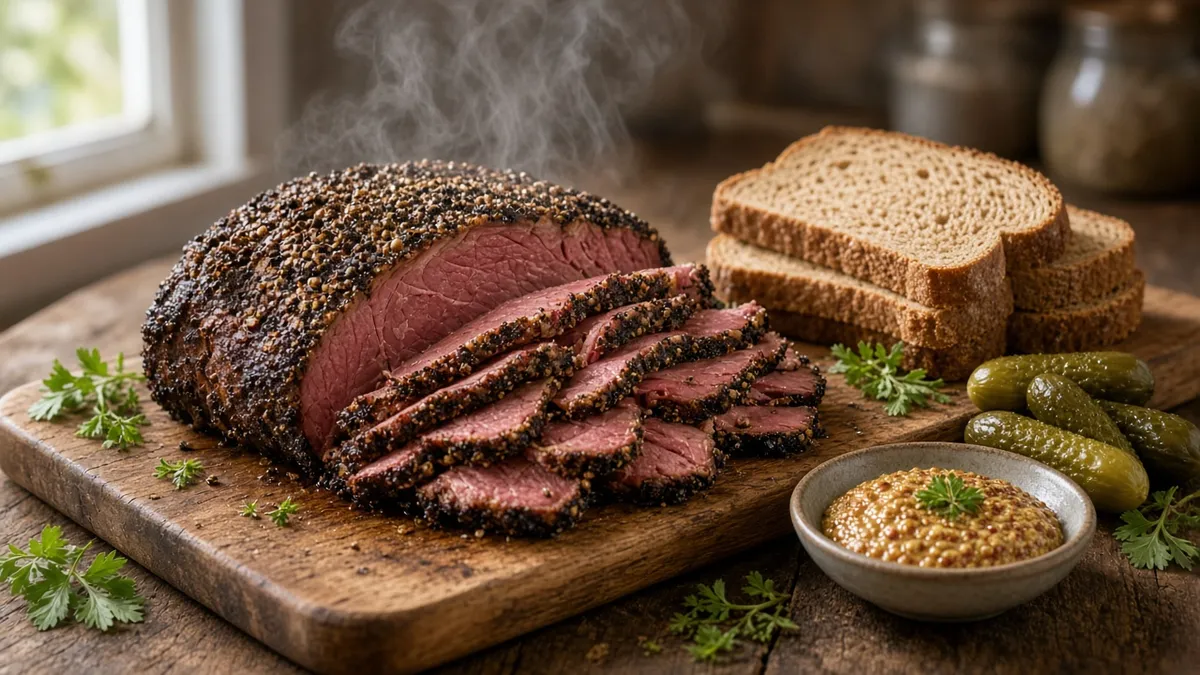
Recipe card
Print / PDFHomemade Beef Pastrami
Rate this recipe
Be the first to rate
- Prep Time
- 30 mins
- Cook Time
- 5 hrs
- Extra Time
- 30 mins
- Total Time
- 5 hrs 30 mins
Ingredients
- 3 pounds trimmed beef brisket
- 1/2 teaspoon Prague powder #1 curing salt, not pink Himalayan salt
- 3 tablespoons kosher salt
- 2 tablespoons brown sugar
- 2 tablespoons coarse black pepper
- 1 tablespoon ground coriander
- 1 teaspoon smoked paprika
- 1 teaspoon garlic powder
- 1 teaspoon onion powder
- 1 teaspoon mustard powder
- 4 cups cold water
- 2 tablespoons apple cider vinegar
- 4 garlic cloves, lightly crushed
Equipment
- Food-safe lidded container — Large enough to hold the brisket and curing liquid
- Mixing bowl — For blending the curing mixture
- Roasting pan with rack — Keeps the brisket above the pan juices
- Instant-read thermometer — Check the thickest part of the brisket
- Sharp slicing knife — Use a long knife for thin, even slices
Method
- 1
Whisk the curing salt, kosher salt, brown sugar, black pepper, coriander, smoked paprika, garlic powder, onion powder, and mustard powder in a bowl.
- 2
Stir the water and apple cider vinegar into the spice mixture.
- 3
Place the brisket in a food-safe container.
- 4
Pour the curing mixture over the brisket.
- 5
Add the crushed garlic to the container.
- 6
Cover the container and refrigerate the brisket for 5 days.
- 7
Turn the brisket once each day during curing.
- 8
Rinse the brisket under cold running water.
- 9
Pat the brisket completely dry with paper towels.
- 10
Rub the brisket with the reserved pepper and coriander mixture.
- 11
Place the brisket on a rack in a roasting pan.
- 12
Roast the brisket at 250°F until the center reaches 195°F to 205°F and feels very tender, about 4 to 5 hours.
- 13
Rest the brisket for 30 minutes.
- 14
Slice the pastrami thinly across the grain.
Notes
| Nutrient | Amount per Serving |
|---|---|
| Calories | 360 |
| Fat | 18g |
| Protein | 43g |
| Carbs | 5g |
Why You'll Love This Pastrami
- It brings classic deli flavor right into your own kitchen.
- The peppery coriander crust gives every slice a savory, fragrant bite.
- A long, gentle roast makes the brisket tender enough for thin slicing.
- One brisket makes plenty for family lunches, sandwiches, and sharing.
- The make-ahead curing time makes serving day feel wonderfully relaxed.
Ingredients
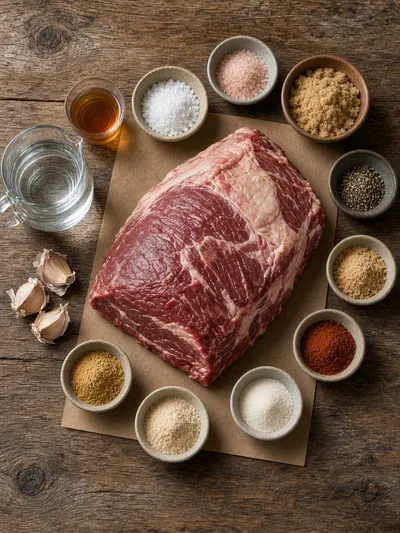
Gather these simple seasonings and a well-trimmed brisket for a homemade pastrami with old-fashioned deli character. Measure the curing salt carefully, and do not substitute pink Himalayan salt.
- Trimmed beef brisket - 3 pounds
- Prague powder #1 curing salt - 1/2 teaspoon, not pink Himalayan salt
- Kosher salt - 3 tablespoons
- Brown sugar - 2 tablespoons
- Coarse black pepper - 2 tablespoons
- Ground coriander - 1 tablespoon
- Smoked paprika - 1 teaspoon
- Garlic powder - 1 teaspoon
- Onion powder - 1 teaspoon
- Mustard powder - 1 teaspoon
- Cold water - 4 cups
- Apple cider vinegar - 2 tablespoons
- Garlic cloves - 4, lightly crushed
How to Make Pastrami
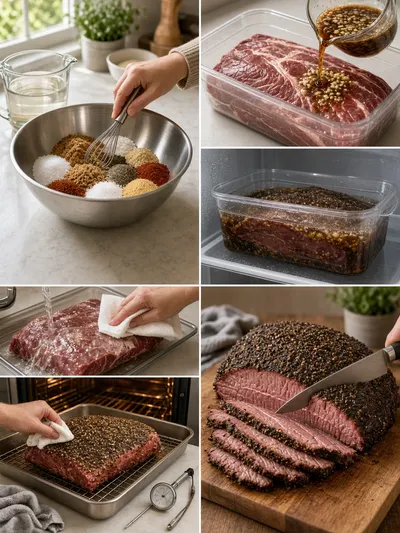
Plan on about 30 minutes of prep, 5 days of refrigerated curing, 4 to 5 hours of roasting, and 30 minutes of resting time. The long, patient schedule is what gives this pastrami its deep flavor and tender texture.
Step 1: Mix the Seasonings
Whisk the curing salt, kosher salt, brown sugar, black pepper, coriander, smoked paprika, garlic powder, onion powder, and mustard powder in a bowl. Set aside a small portion of the pepper and coriander blend before adding the liquid so it stays dry for the finishing rub.
Step 2: Add the Liquid
Stir the cold water and apple cider vinegar into the spice mixture until the salt and sugar are well distributed. This creates the curing mixture that will season the brisket throughout.
Step 3: Prepare the Container
Place the brisket in a clean, food-safe container large enough to hold the meat and curing mixture. Choose a container that allows the brisket to sit mostly or fully submerged.
Step 4: Add the Curing Mixture
Pour the curing mixture over the brisket. Make sure the liquid reaches around all sides of the meat for even seasoning.
Step 5: Add the Garlic
Add the lightly crushed garlic cloves to the container. The crushed garlic will add a gentle savory flavor as the brisket cures.
Step 6: Refrigerate the Brisket
Cover the container securely and refrigerate the brisket for 5 days. Keep it cold throughout the curing process.
Step 7: Turn the Brisket Daily
Turn the brisket once each day during curing. This helps the curing mixture reach the meat evenly on every side.
Step 8: Rinse the Brisket
After the 5-day cure, remove the brisket from the container and rinse it under cold running water. Rinsing removes excess surface seasoning before roasting.
Step 9: Dry the Brisket
Pat the brisket completely dry with paper towels. A dry surface helps the peppery coating cling and brown nicely in the oven.
Step 10: Add the Dry Rub
Rub the brisket with the reserved pepper and coriander mixture. Coat the top and sides evenly for a flavorful crust.
Step 11: Set Up the Roasting Pan
Place the brisket on a rack in a roasting pan. The rack keeps the meat elevated so heat can circulate around it.
Step 12: Roast Until Tender
Roast the brisket at 250°F until the center reaches 195°F to 205°F and feels very tender, about 4 to 5 hours. Begin checking near the 4-hour mark, since the exact time depends on the brisket's shape and thickness.
Step 13: Rest the Meat
Remove the brisket from the oven and let it rest for 30 minutes. Resting allows the juices to settle so the slices stay moist.
Step 14: Slice Across the Grain
Slice the pastrami thinly across the grain with a sharp knife. Cutting across the grain gives each bite a tender, deli-style texture.
Recipe Snapshot
| Feature | Details |
|---|---|
| Category/Course | Lunch |
| Cuisine | American deli |
| Prep Time | 30 minutes |
| Cook Time | 5 hours |
| Extra Time | 5 days curing and 30 minutes resting |
| Total Time | 5 days 5 hours 30 minutes |
| Dietary | Beef-based, no pork |
| Serves | 8 |
| Best Served | Warm in rye bread with mustard and your favorite deli sides. |
Pro Tips for Making Pastrami
- Use Prague powder #1 exactly as measured, and never replace it with pink Himalayan salt.
- Keep the brisket refrigerated during the entire curing period.
- Pat the brisket very dry before adding the dry rub so the crust adheres well.
- Use an instant-read thermometer in the thickest part, and cook until the meat is both in the target temperature range and very tender.
- Always slice across the grain for the most tender serving pieces.
How to Serve Pastrami

- Layer thin slices on warm rye bread with mustard and crisp dill pickles.
- Serve it alongside potato salad, coleslaw, or a simple green salad.
- Add warm pastrami to a toasted sandwich with melted Swiss cheese and sauerkraut.
- Arrange slices on a lunch board with bread, mustard, pickles, and fresh vegetables.
Make Ahead and Storage
Storing Leftovers
- Cool leftover pastrami promptly, then place it in an airtight container or wrap it tightly.
- Refrigerate leftovers and use them within 3 to 4 days for the best quality.
- Store slices with their juices if available to help keep them moist.
Freezing
- Wrap pastrami slices in small portions with freezer-safe wrapping, then place them in a labeled freezer bag.
- Freeze for up to 2 months for the best flavor and texture.
- Thaw frozen pastrami overnight in the refrigerator before reheating.
Reheating
- Warm slices gently in a covered skillet with a splash of water, or steam them briefly until heated through.
- Avoid high heat, which can dry the lean brisket.
- For sandwiches, warm the pastrami just until tender, then serve right away.
Explore more easy breakfast recipes, quick lunch ideas, cozy dinner meals, tasty snacks, and delightful dessert.
Final Thoughts
This homemade pastrami takes patience, but the tender slices and peppery crust make every minute feel like time well spent.
FAQs
Here are a few helpful answers for making and serving homemade pastrami.
Can I use pink Himalayan salt instead of Prague powder #1?
No. Prague powder #1 is a specific curing salt, while pink Himalayan salt is not a curing salt and is not a safe substitute for this recipe.
How long should the brisket cure?
Cure the covered brisket in the refrigerator for 5 days, turning it once each day so the mixture seasons it evenly.
How do I know when the pastrami is done?
The center should reach 195°F to 205°F, and the brisket should feel very tender when checked. The cooking time is usually about 4 to 5 hours at 250°F.
Why should I slice pastrami across the grain?
Slicing across the grain shortens the muscle fibers, making each thin slice easier and more tender to chew.
Kitchen notes
Nutrition & sources
Calorie and nutrition figures on this page are estimates meant for general home-cooking guidance. Actual values vary with brands, portion size, and how the recipe is prepared.
Estimates draw on typical ingredient data from public nutrition databases such as the USDA FoodData Central. They are not a substitute for professional medical or dietary advice.
For how recipes are tested and when pages are updated, see How we test recipes. Full legal context lives in our disclaimers and affiliate disclosure.


Comments
Made this recipe? Share how it turned out for your family.
No comments yet — be the first to leave a note.