


Recipe card
Print / PDF4th of July Sugar Cookies
Rate this recipe
Be the first to rate
- Prep Time
- 20 mins
- Cook Time
- 12 mins
- chilling
- 8 mins
- Total Time
- 40 mins
Ingredients
- 2 cups cake flour (for a soft texture)
- ½ cup all-purpose flour (to balance the dough)
- 1½ tsp baking powder (to help the cookies rise)
- ¼ tsp cream of tartar (to stabilize the egg whites)
- 1 cup sugar (to sweeten the cookies)
- ½ cup salted butter (softened for creaminess)
- ¼ cup butter flavored shortening (for added richness)
- 1 whole egg (to bind the ingredients)
- 1 egg white egg white (for extra lightness)
- 3 tsp vanilla extract (for a delightful flavor)
- 1 cup salted butter (softened for frosting)
- 4 cups powdered sugar (to make the frosting sweet and fluffy)
- 1 tsp clear imitation vanilla (for a pure vanilla taste)
- 4-5 tbsp heavy cream (to achieve the right frosting consistency)
- to taste red, white and blue sprinkles (to decorate and celebrate!)
Equipment
- 2 Baking sheets — For baking the cookies
- 1 Mixing bowls — For mixing ingredients
- 1 whisk — For whisking dry ingredients
- 1 Mixer — For creaming butter and sugar
- 1 Rolling Pin — For rolling out the dough
- 1 Cookie cutters — For cutting out cookie shapes
- 1 Parchment paper — To line baking sheets
Method
- 1
In a large mixing bowl, whisk together the cake flour, all-purpose flour, baking powder, and cream of tartar. Set this mixture aside for later.
- 2
In another large mixing bowl, beat the sugar, softened butter, and butter-flavored shortening together until light and fluffy. This will create a lovely base for your cookies.
- 3
Add the vanilla extract and the whole egg to the butter mixture. Beat until well combined, then add the egg white and mix again until everything is nicely blended.
- 4
Turn the mixer on low and gradually add the dry ingredients to the wet mixture. Mix until just combined, ensuring there are no flour pockets left.
- 5
Cover the mixing bowl with plastic wrap and place it in the refrigerator overnight. This step is crucial for the best cookie texture!
- 6
The next day, preheat your oven to 375°F (190°C) and line two baking sheets with parchment paper. Get ready for baking!
- 7
Remove the chilled dough from the refrigerator. Roll it out on a flat surface to about ½ inch thick. Use floured cookie cutters to cut out your desired shapes, placing 6 cookies on each baking sheet.
- 8
Place one cookie sheet in the oven at a time and bake for 10-12 minutes. You want the edges to be firm but not brown. Let the cookies cool on the baking sheet for 2-3 minutes before transferring them to a wire rack.
- 9
In a medium mixing bowl, beat together 1 cup of softened butter and 4 cups of powdered sugar. With the mixer on, drizzle in the heavy cream until the mixture is fluffy. Adjust the cream for your desired consistency.
- 10
Once the cookies are completely cooled, spread the frosting on top and decorate with your favorite red, white, and blue sprinkles. Enjoy your festive treats!
Notes
| Nutrient | Amount per Serving |
|---|---|
| Nutrition Facts | Per Serving |
| Calories | 150 |
| Fat | 6g |
| Protein | 2g |
| Carbs | 22g |
Why You’ll Love This 4th of July sugar cookies
- Perfectly soft and chewy texture that melts in your mouth.
- Vibrant red, white, and blue sprinkles make them festive and fun.
- Easy to make ahead of time—just chill the dough overnight!
- Customizable shapes for any celebration or gathering.
- Deliciously sweet frosting that adds a delightful finish.
Ingredients
Gather these delightful ingredients to create delicious 4th of July sugar cookies!
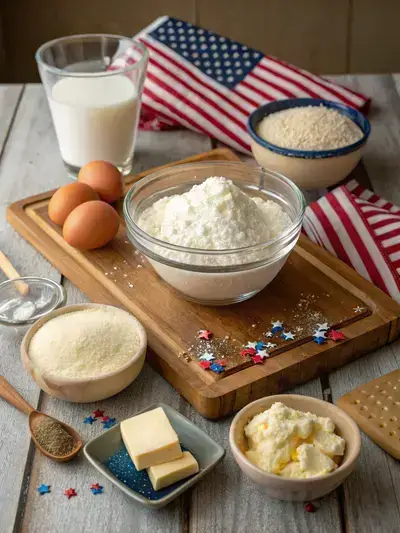
- 2 cups cake flour – for a soft texture
- ½ cup all-purpose flour – to balance the dough
- 1 cup sugar – to sweeten the cookies
- ½ cup salted butter – softened for creaminess
- ¼ cup butter flavored shortening – for added richness
- 1 whole egg – to bind the ingredients
- 1 egg white – for extra lightness
- 1½ tsp baking powder – to help the cookies rise
- ¼ tsp cream of tartar – to stabilize the egg whites
- 3 tsp vanilla extract – for a delightful flavor
- 1 cup salted butter – softened for frosting
- 4 cups powdered sugar – to make the frosting sweet and fluffy
- 1 tsp clear imitation vanilla – for a pure vanilla taste
- 4-5 tbsp heavy cream – to achieve the right frosting consistency
- red, white and blue sprinkles – to decorate and celebrate!
How to Make 4th of July Sugar Cookies
Get ready to celebrate with these delightful 4th of July sugar cookies! With a preparation time of about 20 minutes, a cooking time of 10-12 minutes per batch, and an overnight chilling time for the dough, these cookies are perfect for your festive gatherings.
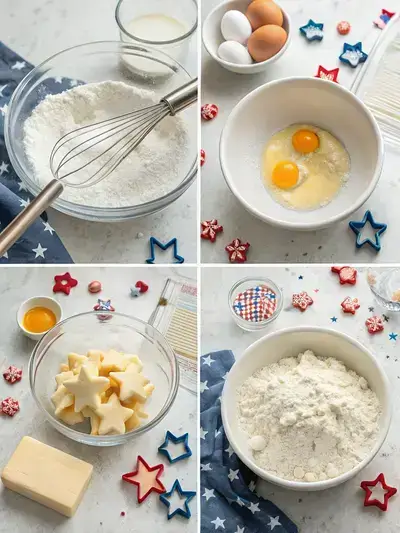
Step 1: Whisk Dry Ingredients
In a large mixing bowl, whisk together the cake flour, all-purpose flour, baking powder, and cream of tartar. Set this mixture aside for later.
Step 2: Cream Butter and Sugar
In another large mixing bowl, beat the sugar, softened butter, and butter-flavored shortening together until light and fluffy. This will create a lovely base for your cookies.
Step 3: Add Eggs and Vanilla
Add the vanilla extract and the whole egg to the butter mixture. Beat until well combined, then add the egg white and mix again until everything is nicely blended.
Step 4: Combine Wet and Dry Ingredients
Turn the mixer on low and gradually add the dry ingredients to the wet mixture. Mix until just combined, ensuring there are no flour pockets left.
Step 5: Chill the Dough
Cover the mixing bowl with plastic wrap and place it in the refrigerator overnight. This step is crucial for the best cookie texture!
Step 6: Preheat the Oven
The next day, preheat your oven to 375°F (190°C) and line two baking sheets with parchment paper. Get ready for baking!
Step 7: Roll and Cut the Dough
Remove the chilled dough from the refrigerator. Roll it out on a flat surface to about ½ inch thick. Use floured cookie cutters to cut out your desired shapes, placing 6 cookies on each baking sheet.
Step 8: Bake the Cookies
Place one cookie sheet in the oven at a time and bake for 10-12 minutes. You want the edges to be firm but not brown. Let the cookies cool on the baking sheet for 2-3 minutes before transferring them to a wire rack.
Step 9: Make the Frosting
In a medium mixing bowl, beat together 1 cup of softened butter and 4 cups of powdered sugar. With the mixer on, drizzle in the heavy cream until the mixture is fluffy. Adjust the cream for your desired consistency.
Step 10: Frost and Decorate
Once the cookies are completely cooled, spread the frosting on top and decorate with your favorite red, white, and blue sprinkles. Enjoy your festive treats!
Recipe Snapshot
| Feature | Details |
|---|---|
| Category | Dessert |
| Cuisine | American |
| Prep Time | 20 minutes |
| Cook Time | 12 minutes |
| Extra Time | 8 minutes (Resting) |
| Total Time | 40 minutes |
| Dietary | Vegetarian |
| Serves | 24 |
| Best Served | With festive sprinkles! |
Pro Tips for Making 4th of July Sugar Cookies
- Chill the dough overnight for better flavor and texture.
- Use a mix of sprinkles for a festive look.
- Keep the cookie thickness consistent for even baking.
- Let cookies cool completely before frosting to prevent melting.
- Experiment with different cookie cutter shapes for fun designs.
How to Serve this 4th of July sugar cookies
- Serve with a glass of refreshing lemonade or iced tea.
- Pair with fresh strawberries or blueberries for a fruity touch.
- Arrange on a festive platter for a colorful dessert table.
- Include them in a picnic basket for a sweet treat outdoors.
- Gift them in a decorative box to friends and family.
Make Ahead and Storage
Store your 4th of July sugar cookies with care to keep them fresh and delicious:
Storing Leftovers
- Place cookies in an airtight container.
- Separate layers with parchment paper to prevent sticking.
- Store at room temperature for up to one week.
Freezing
- Wrap cookies individually in plastic wrap.
- Place wrapped cookies in a freezer-safe bag or container.
- Freeze for up to three months for best quality.
Reheating
- Preheat your oven to 350°F (175°C).
- Place cookies on a baking sheet for 5-7 minutes.
- Check for warmth and softness before serving.
Explore more easy breakfast recipes, quick lunch ideas, cozy dinner meals, tasty snacks, and delightful dessert.
Final Thoughts
These 4th of July sugar cookies are not just a treat; they’re a celebration! With their vibrant colors and delightful taste, they’re perfect for sharing with family and friends. Baking them is a breeze, and the joy of decorating is even sweeter. So roll up your sleeves, gather your loved ones, and enjoy this simple yet rewarding recipe!
Quick answers
Frequently asked questions
Straight answers from the kitchen — storage, swaps, and common sticking points for this recipe.
Can I make 4th of July sugar cookies ahead of time?
How do I keep my sugar cookies soft and chewy?
Can I freeze 4th of July sugar cookies?
What kind of sprinkles should I use for patriotic cookies?
Can I make these cookies without shortening?
Kitchen notes
Nutrition & sources
Calorie and nutrition figures on this page are estimates meant for general home-cooking guidance. Actual values vary with brands, portion size, and how the recipe is prepared.
Estimates draw on typical ingredient data from public nutrition databases such as the USDA FoodData Central. They are not a substitute for professional medical or dietary advice.
For how recipes are tested and when pages are updated, see How we test recipes. Full legal context lives in our disclaimers and affiliate disclosure.


Comments
Made this recipe? Share how it turned out for your family.
No comments yet — be the first to leave a note.