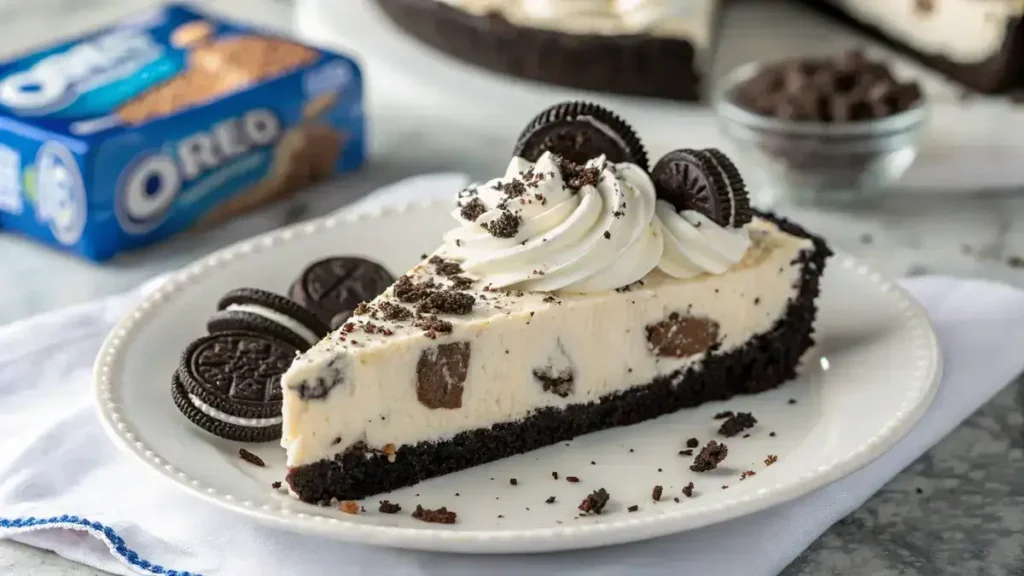
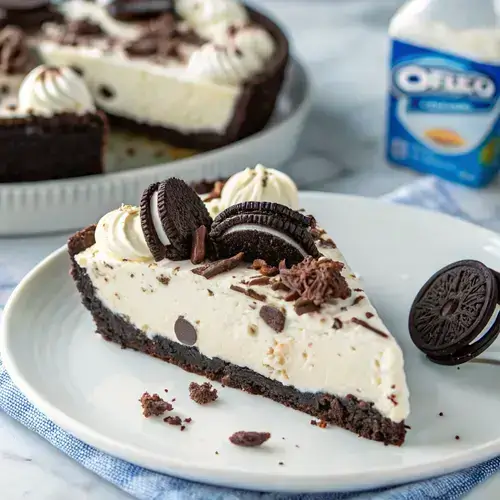
No Bake Oreo Cream Pie invites you into a world where crushed chocolate cookies meet velvety cream cheese clouds in a playful, no-fuss creation. You’ll press buttery Oreo crumbs into a crisp, golden crust that shatters with each forkful, then swirl a dreamy filling of whipped topping and sweetened cream cheese, speckled with crunchy cookie pieces. No oven, no stress—just a few simple steps and a chill in the fridge transforms humble ingredients into a show-stopping dessert. Whether sharing at summer gatherings or cozy nights in, this indulgent treat promises smiles, happy taste buds, and fuss-free fun in every bite.
Table of Contents
Why You’ll Love This No Bake Oreo Cream Pie
- Decadent Oreo flavor in every bite.
- No baking required—easy and quick to make!
- Perfect for any occasion or just a sweet treat.
- Rich, creamy filling with a delightful crunch.
- Customizable with your favorite toppings!
No Bake Oreo Cream Pie
Ingredients
Equipment
Method
- Crush 25 Oreo cookies (wafers & filling) into fine crumbs.
- Stir melted butter into crumbs until mixture resembles wet sand.
- Press mixture firmly into a 9-inch pie pan to form crust. Chill for 10 minutes.
- Beat cream cheese and powdered sugar until smooth.
- Fold in whipped topping gently until well combined.
- Gently stir in chopped Oreos for extra crunch.
- Spoon filling into crust and smooth the top with a spatula.
- Refrigerate for at least 4 hours or overnight for best results.
- Garnish with additional whipped topping and Oreo pieces before serving.
Notes
| Nutrient | Amount per Serving |
|---|---|
| Calories | 350 |
| Fat | 22g |
| Protein | 4g |
| Carbs | 36g |
Ingredients
Gather these delicious ingredients to make your No Bake Oreo Cream Pie!
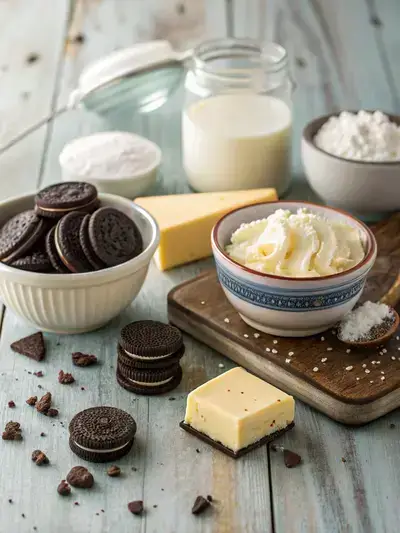
- 25 Oreo cookies – wafers & filling
- 5 tablespoons unsalted butter – melted
- 8 ounces cream cheese – softened
- ¾ cup powdered sugar – sweetener
- 2 cups whipped topping – thawed
- 10 Oreo cookies – chopped
How to Make No Bake Oreo Cream Pie
This delightful No Bake Oreo Cream Pie is a quick and easy dessert that will impress your friends and family. With a preparation time of just 20 minutes and a chilling time of at least 4 hours, you can have this creamy indulgence ready to serve in no time!
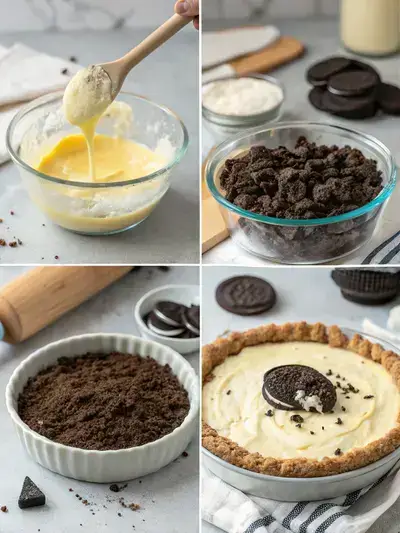
Step 1: Crush the Oreos
Crush 25 Oreo cookies (wafers & filling) into fine crumbs.
Step 2: Mix with Butter
Stir melted butter into crumbs until mixture resembles wet sand.
Step 3: Form the Crust
Press mixture firmly into a 9-inch pie pan to form crust. Chill for 10 minutes.
Step 4: Beat Cream Cheese
Beat cream cheese and powdered sugar until smooth.
Step 5: Fold in Whipped Topping
Fold in whipped topping gently until well combined.
Step 6: Add Chopped Oreos
Gently stir in chopped Oreos for extra crunch.
Step 7: Fill the Crust
Spoon filling into crust and smooth the top with a spatula.
Step 8: Refrigerate
Refrigerate for at least 4 hours or overnight for best results.
Step 9: Garnish and Serve
Garnish with additional whipped topping and Oreo pieces before serving.
Recipe Snapshot
| Feature | Details |
|---|---|
| Category | Dessert |
| Cuisine | American |
| Prep Time | 20 minutes |
| Cook Time | 0 minutes |
| Extra Time | 240 minutes (Refrigerating) |
| Total Time | 260 minutes |
| Dietary | Vegetarian |
| Serves | 8 |
| Best Served | Chilled and garnished |
Pro Tips for Making No Bake Oreo Cream Pie
- Crush the Oreos finely for a smoother crust.
- Let the cream cheese soften for easier mixing.
- Chill the pie for at least 4 hours for best results.
- Top with extra chopped Oreos for added crunch.
- Use a spatula to fold in whipped topping gently.
How to Serve this No Bake Oreo Cream Pie
- Top with extra whipped topping for a fluffy finish.
- Garnish with chocolate shavings or cocoa powder for a touch of elegance.
- Serve with fresh berries like strawberries or raspberries for a fruity contrast.
- Pair with a scoop of vanilla or cookies and cream ice cream for an indulgent treat.
- Drizzle with chocolate or caramel sauce for added sweetness.
- Enjoy with a cup of coffee or a glass of cold milk for the ultimate experience.
Make Ahead and Storage
You can make this delicious pie ahead of time and store it properly:
Storing No Bake Oreo Cream Pie Leftovers
- Cover the pie with plastic wrap or aluminum foil.
- Store in the refrigerator for up to 3 days.
- Keep it in an airtight container for best freshness.
Freezing No Bake Oreo Cream Pie
- Wrap the pie tightly in plastic wrap.
- Place it in a freezer-safe container or bag.
- Freeze for up to 2 months for optimal quality.
Reheating No Bake Oreo Cream Pie
- No need to reheat; serve chilled directly from the fridge.
- If frozen, thaw in the refrigerator overnight before serving.
- Enjoy the pie cold for the best texture and taste.
Explore more easy breakfast recipes, quick lunch ideas, cozy dinner meals, tasty snacks, and delightful dessert.
FAQs
Here’s a helpful FAQ about this recipe:
1. Can I use a different type of cookie for the crust?
Absolutely! If you’re not a fan of Oreos, you can use any chocolate wafer cookies or even graham crackers for a different flavor profile. Just make sure to adjust the amount of butter accordingly to help bind the crust together.
2. How can I make this pie dairy-free?
To make a dairy-free version of this No Bake Oreo Cream Pie, you can substitute the cream cheese with a dairy-free cream cheese alternative and use coconut whipped cream instead of the whipped topping. Just ensure that the cookies you use are also dairy-free!
3. How long should I refrigerate the pie before serving?
It’s best to refrigerate the pie for at least 4 hours, or overnight if possible. This allows the filling to set properly and makes it easier to slice. The longer it chills, the better the flavors meld together!
4. Can I add toppings to the pie?
Definitely! You can top your No Bake Oreo Cream Pie with additional whipped topping, chocolate shavings, or even more chopped Oreos for an extra crunch. Get creative with your toppings to make it even more indulgent!
Final Thoughts
Get ready to indulge in a slice of nostalgia with this No Bake Oreo Cream Pie! It’s incredibly simple to whip up, and the delightful combination of creamy filling and crunchy crust will have everyone coming back for seconds. So gather your ingredients, channel your inner pastry chef, and enjoy this sweet treat that’s sure to bring smiles all around!